The trend towards harnessing renewable sources of energy is increasing in the face of globalization. Renewable options, including wind, solar, hydro, biomass, or agricultural wastes, are advantageous as they are cheap and incur minimal impacts on the environment.
In this article, we will harness the potential of one the renewable alternatives, solar energy, to make food. We will take leverage of the fact that the sun is the largest heat source there is on this planet.
Follow the details on how to make a solar cooker, and you’ll surely make one in no time, as the materials are easy to secure and the instructions are easy to follow.
Table of Contents
Items needed
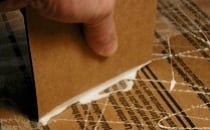
- Cardboard – These provide the main framework of the oven or cooker. Cardboard is used since it is a good insulator providing protection from undesirable fluctuations in temperature around. Large sheets from old boxes can be used.
- Duct tape – This material is used to combine the components. Its conductivity is also taken leverage of.
- Aluminum Foil – This serves as the reflector panel of the oven simulating heat for the food.
- Black paint – to increase absorptivity of heat
- Glue – to paste or stick up components
- Thermometer – used to gauge the temperature of the chamber
- Plastic – for food safeguarding
- Shredded paper – to be inserted at the cardboard to increase insulation
- Other auxiliary items such as scissors, knife, ruler, measuring stick, markers, brush to make the set-up
The Process
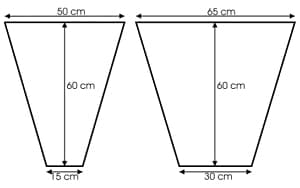
- Step 1: Cut the cardboard with the prescribed shape and measurements below. Cut two of each shape in the blueprint. This will serve as the reflective pan of the set-up. In the process, use markers, ruler, scissors, or cutter to cut out the shapes.
- Step 2: After cutting out the blueprint, apply glue on one side of each shape. You can dilute the glue with water for faster spreading.
- Step 3: On the sides applied with glue, cover the whole section with aluminum foil. The whole expanse should be free from wrinkles and creases. You can continually apply pressure until the surface becomes flat. Avoid tear-outs as well, as this decreases efficiency.

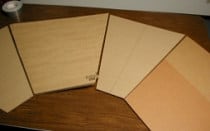
- Step 4: Cut the excess foils and glue as necessary and arrange the cut-outs such way below in preparation for the assembly of the reflective panel.
- Step 6: Join the pieces together using duct tape. Make sure the set-up fit is achieved leaving no spaces.

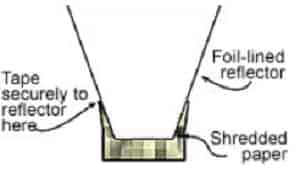
- Step 7: Get another cardboard box such that it fits at the bottom of the panel, similar to what is seen below. Insert pieces of shredded paper inside the attached box.
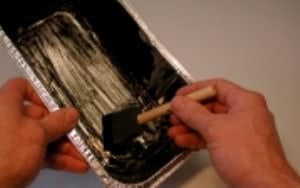
- Step 8: To prepare the baking chamber, get another box and apply a mixture of black paint and glue on it. Cover with aluminum foil again after. You might want to double insulate your chamber with those again if you want.
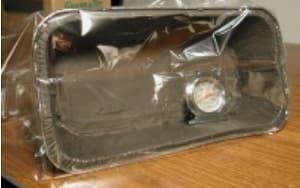
- Step 9: After finishing the baking chamber, slip this into a plastic bag with a thermometer on it.
- Step 10: Press this set-up at the bottom of the reflector such that it becomes the main recipient of light thereafter.
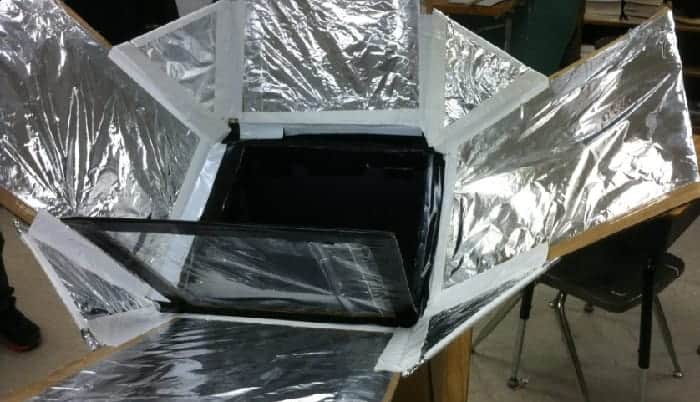
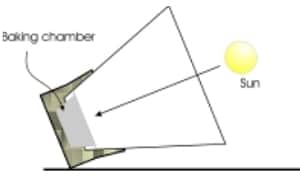
- Step 11: Time to test the set-up. Position your crafted cooker in such a way as depicted below.
- Step 12: The position of the solar oven should be established such that the sun squarely faces the chamber and the shadow of the reflector is minimized. Support the set-up as needed to achieve the position allow the set-up to absorb as much sun as it can get.
- Step 13: Record the temperatures registered in the thermometer. A 100oC temperature makes it good for heating food while at 175oC or higher, baking can be carried out already.

- To incorporate the raw food, take out the chamber and the plastic and slip them in. Make sure to use gloves when handling the set-up as the aluminum is highly conductive with heat.
Conclusion
There are various ways to be creative at the same time be environment-conscious in carrying out our activities. One of them is harnessing the potential of solar energy to supplement our energy needs such as cooking. In this project, there are many other products that took leverage of the sun as the prime source of heat of the Earth, for example solar tubes, solar refrigerators and solar water pumps.
Making a solar cooker out of household items allows you to be knowledgeable about the scientific principles of solar energy but reinforce your creativity and resourcefulness at the same time.

I am Kathleen Miller, staff writer and reviewer of the Avasolar team. Working with the team has been a pleasure for me so far, I hope to bring readers useful information by creating detailed and easy-to-follow contents.