
Many of us would like to give our outdoor areas a fresher and livelier look. And, one of the things to do so is adding excellent outdoor lighting. But, lighting up an entire outdoor area can be expensive, so DIY solar light projects are one great solution.
If you’re short on budget, it will help if you learn how to make a solar light from scratch. In this post, we’ll provide you with some brilliant DIY ideas on how to create your own solar light. The result will be impressive and eco-friendly lighting that makes your outdoor areas more stunning on ordinary days and special occasions.
Table of Contents
- The Process of Creating your Solar Light from Scratch
- Materials Needed
- Step 1: Prepare the wires.
- Step 2: Connect the light to the circuit board.
- Step 3: Link the circuit board to the battery holder.
- Step 4: Drill the lid.
- Step 5: Link the solar panel with the circuit board.
- Step 6: Glue all the components together.
- Step 7: Set up your switcher.
- Step 8: Pick your location.
- Step 9: Test it.
- Is It Worthwhile to Make Your Own Solar Lights?
- Conclusion
The Process of Creating your Solar Light from Scratch
The delightful news is that installing solar lights in your garden, pathway, and other outdoor areas does not need to be costly. Plus, DIY solar lights installation for your outdoor areas does not call for any electrical or technical knowledge.
Materials Needed
- LED lights
- PCB circuit board
- Soldering machine
- Rechargeable AAA NiMH batteries
- Superglue or hot glue gun
- Battery holder
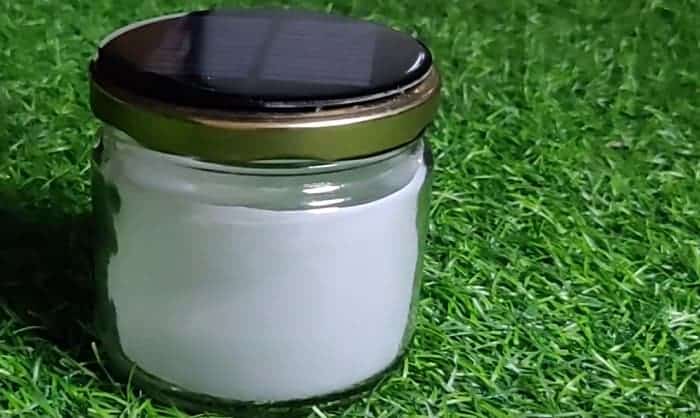
- Jar
- Drill
- Solar panel (2 Volts)
Now that you have all the materials ready, here are the steps you need to follow to make a solar-powered light:
Step 1: Prepare the wires.
Note that wiring is the most critical process of creating a solar-powered light from scratch.
Avoid making any mistakes when dealing with wires because they will be in charge of supplying electricity to your solar lights. Trim the wires properly before connecting them. A perfect trimming will allow you to fasten the cable in the appropriate place.
Likewise, cutting is vital for fastening distinct edges with perfect connection. Be sure to consider the distance of the cable from one side to another. Unrequired cables are more likely to cause a short circuit that could lessen the cable’s lifespan.
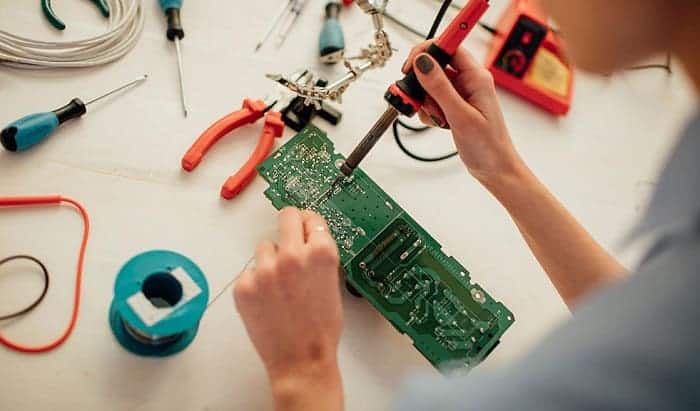
Step 2: Connect the light to the circuit board.
The circuit board serves as the core of an electrical device. In solar-powered lights, a circuit board keeps a connection with the light, battery, and cable. So, you need to link the light to the circuit board correctly.
The light fixture will acquire power from the board via the cable that you’ve already installed. Be sure to measure the voltage before you finish everything so that a correct connection is guaranteed. You also have to inspect the connecting hubs and ports to ensure safe operation.
Step 3: Link the circuit board to the battery holder.
It is impossible to run a solar-powered light directly from the solar panels. So, it would help if you linked the circuit to the battery. The battery will obtain energy from the solar panel via a charge controller, and this energy will be carried to the light through a circuit board.
Be sure that you understand the output and input voltage. You have to consider the length and thickness of the cable and the inverter. This will depend on the type of connection.
Luckily, this process is uncomplicated, and you can accomplish it in a few minutes. The task is similar to linking electrical lights on the light holders.
Step 4: Drill the lid.
Put the circuit board aside and take the jar’s lid. Drill a hole on the lid, and avoid placing the lid on a surface that might break it. The hole should be in the middle of the lid to enable the panel to be stable and to let the black and red wires fit the lid perfectly.
Step 5: Link the solar panel with the circuit board.
The solar panel will acquire energy from sunlight and store it in the battery. Meanwhile, the solar circuit board is in charge of obtaining power from the solar panel.
It is critical to re-inspect all the connections before placing the solar panel in full sunlight exposure. Circuit boards and solar panels function together to supply power to the light; hence, it’s essential to keep everything secure and up-to-date.
Step 6: Glue all the components together.
The next step is to install all the collected components correctly. Put them together and fasten all the components using adhesive or glue. To do so, utilize waterproof glue that is ideal for plastic attachment.
If your design should be attached with screws, you can skip the glue part. However, using screws and glue together creates a more solid bonding.
Carefully apply the hot glue or super glue on the solar panel side and solidly press the wires next to it to glue them perfectly.
Afterward, you can close the lid of the jar, and from there, you already have a solar-powered light.
Tip: If your solar panel does not come with built-in wire, you can quickly fix it with a soldering iron. Using a soldering iron, ensure that the positive wire is linked appropriately to the positive terminal. Also, connect the negative wire to the negative terminal.
Step 7: Set up your switcher.
A switch between the battery and the solar-powered light will allow you to take complete control of the light. This will also help save more electricity. Note that solar-powered lights need solar switches that perform outstandingly with AC and DC output.
Moreover, a high voltage switch is incapable of working with solar light and solar panels. To better understand how a solar light works, please click here.
When setting up the switch with the solar-powered light, set it up in an accessible spot.
Alternatively, you can set up a switch with dual power modes; one for the low light and one for the high light. This is beneficial for obtaining your light requirements.
Tip: If the circuit board you purchased does not have a switch, you’ll need to purchase one and utilize a soldering iron to link the switch to the board. Cut the red wire on both edges, and the striped edge should be one and a half-inch long. Then, carefully fasten the exposed wire to the switch’s terminals.
Step 8: Pick your location.
You now have a complete solar-powered light as everything is all set. Now, choose the perfect spot for installing the light. Keep the light in your preferred location and add the installation screws and frame with the appropriate measurement.
Step 9: Test it.
It is now time to inspect how your DIY solar lighting performs. To do so, follow these steps:
- Examine the production of energy
Inspect your solar panel’s energy production rate. Without adequate energy, you cannot operate the solar-powered light and anticipate outstanding brightness. Low voltage will offer you less brightness than the solar panel’s efficiency.
- Look at the output
The battery will provide you precise light output when the solar panels are generating adequate energy. Inspect your battery’s performance. To do so, you need to compare the discharging and charging performance of your battery.
- Inspect the solar light’s performance
You should obtain sufficient energy for running your solar lights if everything goes well. The light will supply you with more brightness, and you could gauge it with lumens.
Is It Worthwhile to Make Your Own Solar Lights?
Solar lighting is wire and cord-free, which means that it is a safer alternative. You only need to position the solar lights in a spot where they could absorb ample sunlight. Solar-powered lights also use a low voltage technology.
Fundamentally, solar lighting is rapidly changing countless lives globally. It significantly helps minimize energy expenses for low-income families and supplies alternate energy in areas where there is abundant sunlight.
You can bring this energy-saving and fun-filled trend into your home with just a few straightforward ideas and steps. Smooth sailing to set up and DIY, solar lighting is certainly a home improvement option that you can’t ignore.
Sure thing, it is easier to search for solar lighting products online; however, creating your own solar lights can offer you a more rewarding experience.
You can save more since some of the materials needed for your DIY project are often available in your storage area. More importantly, DIY projects can offer you the opportunity to unleash your hidden talents and artistic skills.
Conclusion
Did you enjoy this DIY solar light guide? Learning the step-by-step process of how to make a solar light from scratch is not as complicated as you think.
The good news is that you can find most of the materials you need at home or online stores. Creating DIY solar lamps is easy even for beginners. We hope that the ideas and tutorials we have shared in this article can help you create your dream solar lights for your home.
Lastly, please share this post if you find the information and tutorials helpful.

I am Kathleen Miller, staff writer and reviewer of the Avasolar team. Working with the team has been a pleasure for me so far, I hope to bring readers useful information by creating detailed and easy-to-follow contents.