
When using solar panels, you must know the proper ways on how to test a solar panel with a multimeter since the task comes with plenty of perks. First and foremost, a properly-installed multimeter can satisfy your power requirements.
What’s more, you’ll have accurate information to maintain your solar power system. First, however, how do you start? While correctly testing your solar panels is very valuable, this is a commonly neglected procedure.
We have shared some of the steps necessary when testing solar panels using a multimeter in this post, so please keep reading.
Table of Contents
Where to Start When Testing Your Solar Panels
Testing solar panels is vital before you obtain COD (Commercial Operation Date). First, you must validate that your solar project is all set to work. Then, once the solar panels are installed, you will want to examine the output to ensure that you’re obtaining the power you require.
In general, it’s more likely for you to require more than one solar panel; however, it is critical to know how many you will need. Therefore, we have included a comprehensive guide on testing a solar panel, with some instructions and tutorials below. Hopefully, we can assist you once you purchase your first solar panel.
Let us initially talk about all the factors you need to uncover about solar panel systems and how they operate.
Learn More about your Solar Panel Systems
There are two classifications for electrical current; these include the alternating current (AC) and the direct current (DC). Direct current merely flows in a single direction, and it’s utilized for low voltage requirements like solar panels.
Generally, it is vital to gauge the output in watts because most home appliances gauge power using this method. Note that there is a particular computation that you’ll have to utilize for solar panel testing.
In a more straightforward approach, this is how it goes: wattage = voltage.
You’ll have to gauge the wattage and voltage to compute the power production of a solar panel system and figure out if it is adequate for your requirements.
Measure the Solar Panel Amperage
You’ll need an amp meter to test solar panels. First, attach the meter to the positive and negative; this will allow you to gauge your solar panel’s amp output. Then, make sure that the panel is in full sunlight when you test so you can obtain a precise measurement.
Please be guided that you’ll need an amp meter that would gauge higher than the amp output of your solar panel to obtain a precise measurement.
Measure the Current
A multimeter and resistors are the appropriate equipment needed for this step. These are necessary for measuring the DV voltage. After this measurement, the accurate formula will be the current equals the voltage.
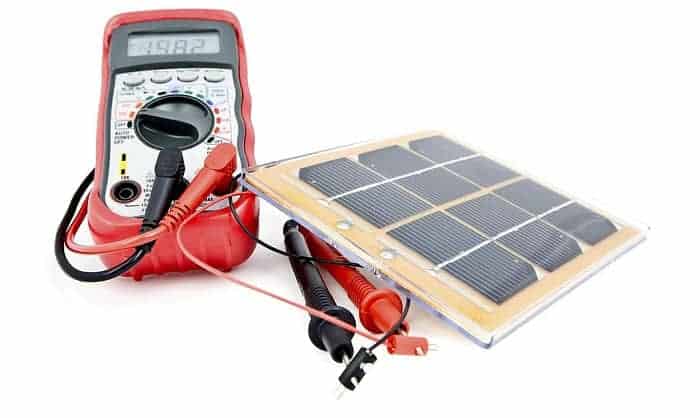
How to Measure Solar Panel Output with a Multimeter
Before testing the solar panels using a multimeter, we need to know what a multimeter is. A multimeter is a portable device that is mainly utilized to determine amperage, voltage, plus other values.
A multimeter device comes in two forms, and these include the digital versions, which are more innovative than the analog versions. On the other hand, analog multimeters are generally less expensive; be that as it may, you might find them a bit complicated to interpret precisely.
When testing a solar panel, misusing the multimeter can bring damage to the panels. Likewise, solar panel testing is the only means to unveil if you have bought premium quality panels.
Here are the pro tips when testing the solar panels using a multimeter:
- Find the Converter Box
The converter box is situated on the rear portion of a solar panel. Once you find it, remove the cover. You will see the connections inside after removing the cover.
- Spot Positive and Negative Connections
Once the negative and positive connections are noted, you must ensure that the panel is in full sunlight. Tilt the panel so it could absorb as much sunlight as possible.
- Set your Multimeter to DC
Inspect to ensure that you’re gauging at a higher level than the voltage the solar panel is graded for. For example, let’s say, if the panel is rated for 20V, your multimeter will have to be set to read higher.
Doing so will help you obtain a precise reading. You will also need to inspect the inside of the converter box to determine the voltage rating of your panel.
- Link the Alligator Clips
Link the red lead from the alligator clips to the positive side. Then, link the black lead to the negative side. Once this step is completed, your multimeter should provide a precise voltage reading that your solar panel generated.
Note that new solar panels should generate a voltage that is similar to the one that is approved. Meanwhile, you might obtain a lower reading if the solar panel is used. Be reminded to detach the alligator clips after you have turned off your multimeter.
Testing the 12-Volt Solar Panels
Most solar panels are 12-volts, so the testing methods for solar panels are fundamentally similar. It is substantial to position the positive to positive and negative to negative. This is a robust approach to consider when connecting your multimeter to the connection on the rear section of the solar panel.
Be sure to set the meter to above 200 VCD so you can obtain the most precise reading. Note that if your multimeter indicates an overload, you’ll need to adjust the VCD to a higher rating because the VCD was too low.
You should obtain a precise reading on your panels so long as your multimeter is working correctly. Nonetheless, take in mind that not all meters are the same. Multimeters tend to vary in design, quality, and price.
Testing the Charge Controller
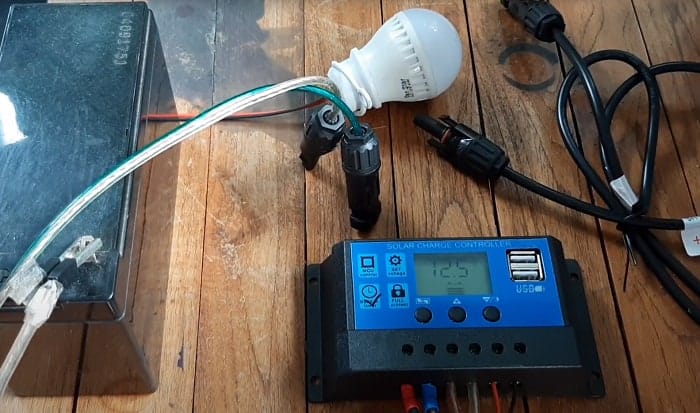
It is also critical to test the controller when testing your solar panels. This will be pretty beneficial in the case of solar plus storage.
Here are the pro tips when testing the charge controller:
- Set the Meter
Fix the meter to gauge DC amps and ensure that the leads are in the appropriate port to gauge DC amps. From there, you can set the meter to ~10A.
- Link the Solar Panel to the Controller
Connect the panel to the charge controller and the controller to the battery.
- Detach the Positive Lead
The next step you’ll need to do is detach the positive cable between the battery and the controller.
- Connect the Positive Cable
Attach the positive lead from the meter to the positive cable; this will allow you to gauge the current.
- Link the Negative Lead Alligator Clips
The final step is attaching the negative lead alligator clips of your multimeter to the battery’s positive terminal.
Ultimately, this procedure will gauge the current flowing between the controller, solar panel, and batteries.
Heads Up
You need to handle, utilize, and store a multimeter correctly so as to avoid obtaining inaccurate readings. Once you finish using the device, be sure to turn it off to extend its battery life.
Here are some safety measures in handling and using a multimeter:
Please note that these safety measures apply to analog and digital meters.
- Avoid dropping the device. Multimeters can be fragile, so you should handle them with utmost care.
- Avoid overloading the meter. When you feel uncertain, utilize a high range that you know won’t be overloaded. There’s nothing to worry about because you can quickly shift to a lower range if needed.
- Avoid tampering with precision instruments. Refer to a licensed or professional instrument repair person to fix the device for you.
- Be sure that the range switch is set to a correct position before attaching the meter to the circuit.
- Scrutinize the circuit connections before applying power to the device.
- Avoid touching or interfering with any other electronic parts inside the equipment.
- Do not touch the probe tips to each other while attached to anything else.
- Do not switch settings while the probes are attached to the circuit.
As always, your safety should be your top priority. To avoid any unfortunate incidents, be sure to follow the precautions shared above.
Conclusion
Lastly, testing your solar panels is a critical step in the course of going entirely off-grid. It’s necessary to know how the solar panels work in their preferred installed site before you switch them on and start generating power. Overall, A multimeter is always needed for most types of solar panels, such as solar panels for van, low light solar panels, and marine solar panels.
We hope that how to test a solar panel with a multimeter instructions we’ve shared will help you get the most out of your solar panel generation and maximize their performance. If you find our post about testing a solar panel with a multimeter informative, please feel free to share it.

I am Kathleen Miller, staff writer and reviewer of the Avasolar team. Working with the team has been a pleasure for me so far, I hope to bring readers useful information by creating detailed and easy-to-follow contents.